![]()
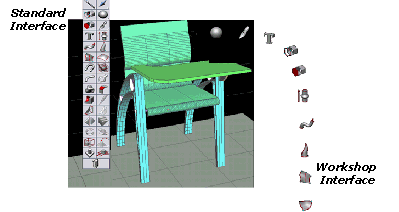
The user has access to three main tool palettes. Amapi 3D provides two different interfaces for the display and use of these tools:

· One interface
follows the “workshop” paradigm: it is specially designed to allow the
user to move freely about the Amapi 3D work space, simulating as closely as possible the
natural movement of a designer at the drawing table, or the movement of a sculptor in his
workshop.
· The other interface
has the advantage of being more familiar to most users, being more of a “standard”
interface.
For more details on the choice of interface, see the chapter User Manual/Edit/Preferences/Interface/Tool palettes.
How do you pick up a tool?
Before using a tool, you must select the object you wish to
edit. It is the current object (see chapter User Manual/Tools/Assistant Palette/Selection
tools/Wand).
Then, click on the desired tool.
How do you change palettes?
· If you selected
the Workshop interface, move the cursor outside the right side of the scene and then back
into the scene.
· If you selected the
Standard interface, you do not have to change the palette as all the tools are grouped
into a single Tools Palette.
How do you end the action of a tool?
There are two ways to do this:
Validate:
· In the Assistant
Palette: Click on the “OK” button.
Or
· On the keyboard:
Press the Return key.
Validating an action will quit a tool. The cursor will
switch back to the Wand, and you will be able to select a new tool or object.
Putting the tool aside:
· If you selected
the Workshop interface: Move the cursor outside the right side of the scene and then back
into the scene to put the tool aside. You can then select another object or pick up a new
tool.
· If you selected the
Standard interface:
· Select another
tool in the Tools Palette to keep on working with the current palette.
Or
· Select a
construction tool.
![]() Selecting
another tool will automatically drop the previous tool (standard interface). See chapter
User Manual/Tools for more details.
Selecting
another tool will automatically drop the previous tool (standard interface). See chapter
User Manual/Tools for more details.
![]()